Based on the solar oven built at SIFAT (Servants in Faith and Technology), Lineville, Alabama, in the Spring practicum, May 1996. Updates for the web version 7/2003 are noted as well. The text refers to step-by-step illustrations that may not correspond exactly to the text that was available at the time of web publishing, so be prepared to interpret these comments somewhat!
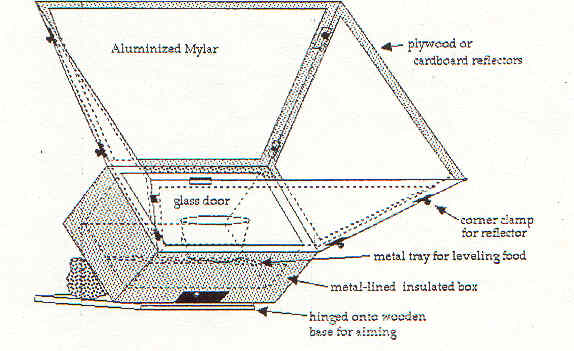
This solar oven will cook foods at temperatures between 250 and 350 degrees. It bakes bread in about one and a half hours. Three loaves of bread or two pots will fit in the oven.
These are step-by-step notes for the oven that we built. There are many possible substitutions that could be made in the materials, and the plans can either be followed exactly or used as a guide in planning your own oven.
If working in a group, the oven box and the reflectors can be built in parallel.
Materials:
thicker plywood (we used 5/8")
26 gauge sheet metal
2x4, 52 inches long
loose fiberglass insulation
3/16 or 1/4 inch luan plywood
Aluminized Mylar reflective plastic*
silicon caulk
1 1/4 inch drywall screws
6-penny nails
1 1/2 inch angle iron, 16 inches long
(8) 1/4-inch bolts with nuts, 1 1/2" long
black paint, preferably high-heat
double-strength glass (1/8"), 23" x 15"
*Note 7/2003: This material is available from Canal Plastics Center
(325 Canal, New York City, NY, USA,
Ph: 212-925-1032, fax 212-431-5901) by mail order, if you cannot find
a local source.
1: Make a box.
Build an open-topped plywood box out of the thick plywood, with inside
dimensions of 12 inches high, 17 inches wide, and 24 inches long.
The outside dimensions will vary based on the thickness of the plywood.
Tack the box together with finish nails, then fasten permanently with drywall
screws.
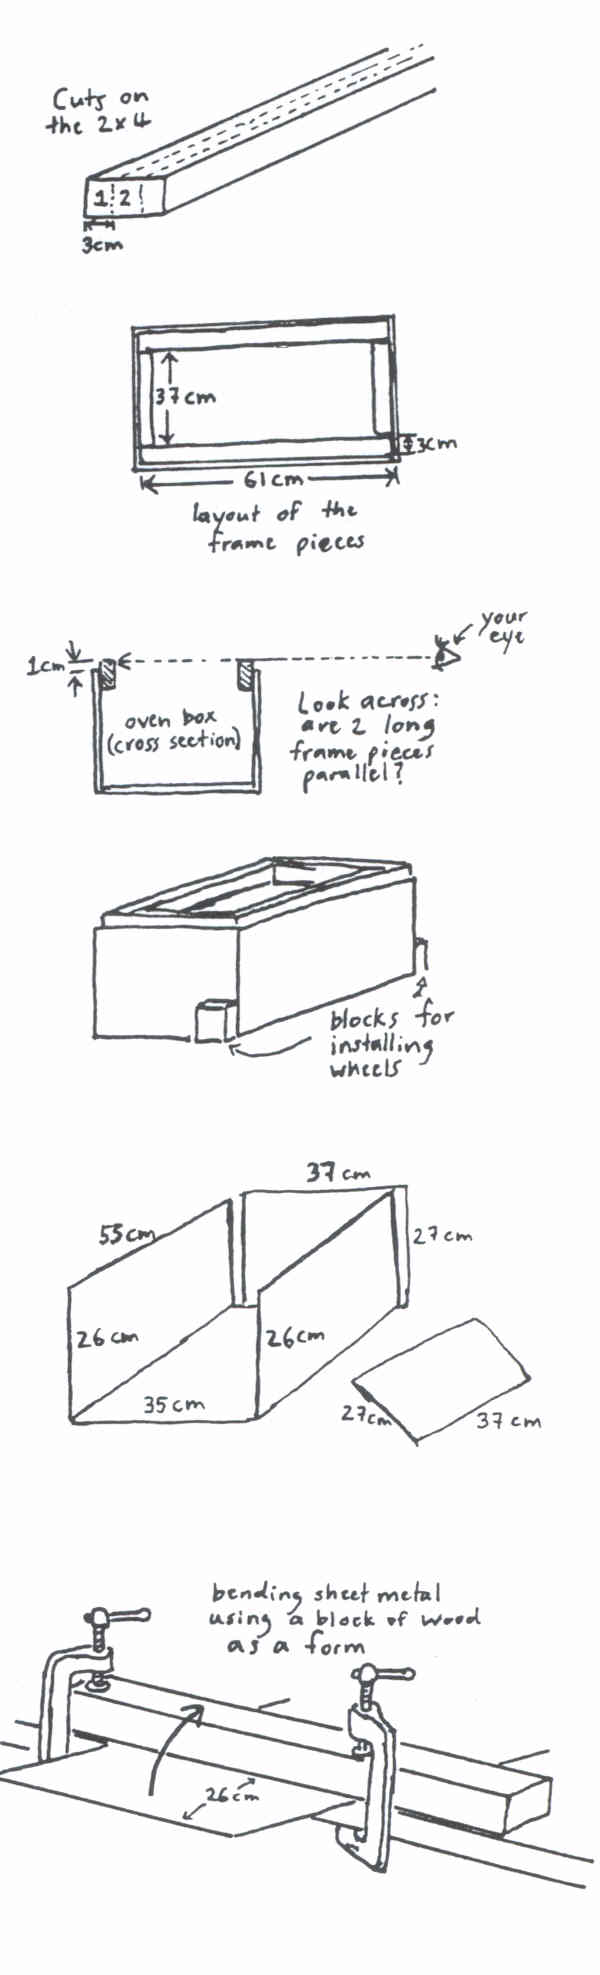
2. Make a frame around the top of the box.
With table saw, cut two slices the long way down the 2x4, one inch
thick by 1 1/2 inch high. Use the table saw to cut out a corner of the
2x4 as shown. Then cut four frame pieces Cut cif these, to fit on the inside
of the box. Cut the corners at 45 degrees, like a picture frame. You may
need to trim the corners to make the frame fit. (If you don't have
a mitre box or radial arm saw, just cut the sides of the frame at 90 degrees
and install in the box as shown. This only changes the looks of your oven.)
Install the frame, one side at a time, with drywall screws. The frame pieces
should stick up 1/2 inch above the sides of the box and the ledge for the
glass should be to the inside. As you install the frame, check that the
glass oven door sits level on the ledge without rocking.
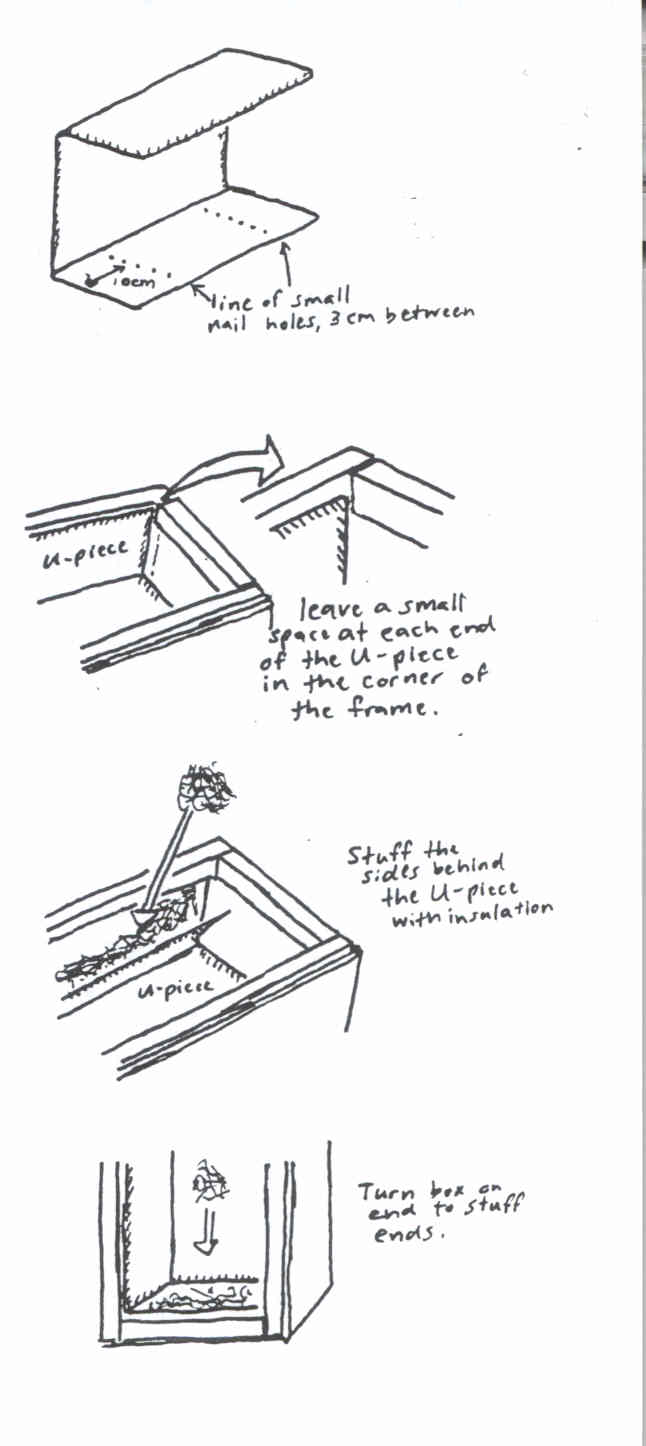
3. Cut and fold the metal liner.
Three pieces of 26-gauge metal form the metal liner of the oven box.
One is a piece 22 by 36 inches. This is folded into a u-shape that covers
the 2 long sides and the bottom of the oven box. The other two measure
15 by 10 3/4 inches, and line the two ends of the box.
Cut these pieces. Before cutting, double check the measurements of
the top frame, and cut accordingly. The larger piece should be about 1/16
inch shorter than the oven box (22 inches) to allow the two end pieces
to but up against it. Caulk will seal the cracks along the edges
of the liner. Drill a 1/4-inch hole in each of the end pieces, as shown.
The oven tray will hang from a bolt through this hole.
Fold the larger piece as shown. Square folds can be made by clamping
the sheet metal to a table, sandwiched between two angle irons as shown.
Begin the folds by pulling the metal with your hands or pushing it with
a long block of wood. The fold can be squared up by hammering', with a
block of wood to protect the metal.
4. Install the metal liner and insulate the box.
Begin installing the liner by placing a layer of insulation at the
bottom of the box. (Note: there are many alternatives for insulation,
provided they will not melt or smoke at temperatures of about 300 degrees:
newspaper.s, cotton rags, straw, etc.) There should be enough insulation
to support the larger unshaped piece about 1 1/2 inches from the bottom
of the box. We placed two layers of fiberglass house insulation (after
removing the paper backing) on the bottom and sides of the box. The insulation
on the sides of the oven should be packed in enough to support the metal
sides.
When satisfied with the fit of the metal liner pieces, stuff the sides
behind the metal liner and nail the liner into the top frame. The top of
the liner should be 1/2 inch below the ledge for the glass door. Before
nailing the two end pieces of the liner, insert a quarter-inch bolt for
the tray support. Tighten well and insure enough extra length on the bolt
to attach the tray in the hole, with washers on either side of the metal
for strength.
Caulk the seams between the liner pieces with silicon caulk.
5. Finish the Oven Box
When the caulk is dry, paint the inside of the oven box flat black.
A high heat, oil-based paint will be more durable, but any flat black paint
will do. We left the top 4 inches of the liner without paint, so that light
hitting this surface would be reflected toward the tray and the lower part
of the oven. Important: allow the oven to bake once without food. This
cures the paint, so you dont eat the paint fumes.
Make a handle for the door and attach it to the glass with silicon
caulk. We used a 3/4 by 1/2 by 4-inch piece of cedar, which we roughed
on the bottom to make it stick better.
Make a tray for the oven. We cut a piece of heavy gauge metal from
an oil drum, bent down a quarter-inch strip on the sides to make it more
rigid, and hung it from the support bolts with wire that we bent and twisted
to provide three height settings.
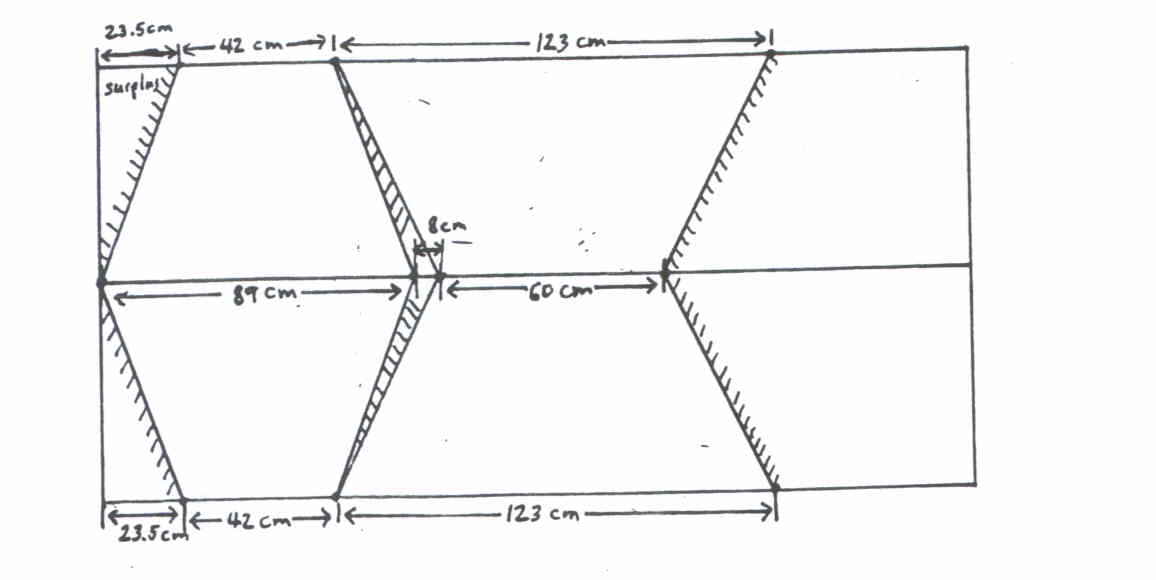
6. Cut the reflectors from quarter-inch Luan plywood.
Cut according to the measurements shown. The 24" width is half of a
4x8 sheet. A handsaw produces the straightest cut, due to its wide
blade. Take care to stay on the line. These cuts will leave some
remnant for use in other ovens. Luan is quite splintery, so sand
the edges well.
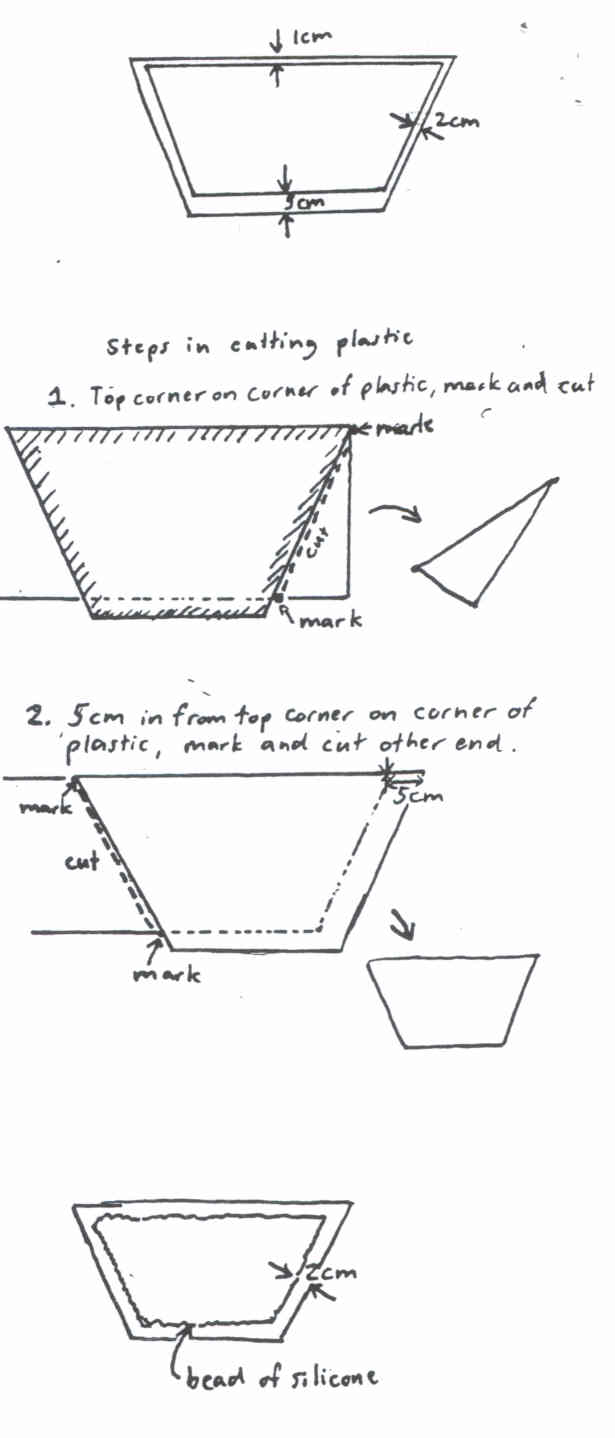
7. Cut mirrorized plastic for the reflectors.
Mark lines on the reflectors, 1/2 inch from the top, 1 1/2 inches from
the bottom, and 3/4 inch from each side. These lines mark the edges of
the plastic and can be used as guides for cutting the plastic. The plastic
pieces are 22 inches high.
Cut the plastic with a single-edged ra2or blade and a straight edge.
You can use the reflector as a backing for cutting. Our roll of mirrorized
mylar plastic was 61 inches wide, and we found we could cut all four reflectors
out of a 22 inch section of this roll, by reusing the scrap created in
the first cut, as shown. If your plastic or mirror material has a front
and back side, be sure to observe this in cutting and gluing. (Note:
there are alternatives to commercial mirror plastic. The inside of potato-chip
bags is one alternative source of mirror plastic. Different brands have
different reflective qualities. Aluminum foil can also be tried, although
it will lessen the effectiveness of the cooker.)
8. Glue the mirror plastic to the reflectors
Put a continuous bead of silicon around the back edge of each piece
of plastic. The bead should be about 1/2 inch from the edge and about 1/4
inch thick. Then place each piece of plastic on the plywood reflector according
to the lines that you drew. Press the plastic down along the edges to spread
the bead. A ruler can be used to press along the whole edge. The reflectors
can be stacked when finished and a weight placed on top to press the plastic
while the silicon hardens.
9. Make 8 corner clamps for the reflectors
The corner clamps are made from 2 pieces of 1 1/2-inch aluminum or
steel angle iron, with a quarter inch bolt to tighten them. Mark 16 1 1/2
inch lengths on a piece of angle iron, with holes in the middle of each
piece as shown. The holes go out through the corner of the angle
iron. Drill the holes before cutting the pieces. Use a drill bit slightly
larger than 1/4 inch, so that the angle irons are free to move around on
the bolt.
*Note 7/2003: about the shape of the reflective cone: since initially writing these instructions, we have realized that the use of reflective mirror in the corners of the cone is not as efficient as possible, since incident light is often bounced back and forth between the two adjoining surfaces before entering the box. A more efficient design is to make an 8-panel cone with an octagonal cross section at the top, and four small triangular panels, one in each corner, from which incident light travels directly into the box (see the 2000 STEVEN newsletter). This design is more complicated to build but also delivers more energy for the same use of materials. We do not include this variant in these instructions, but we are confident that readers can adapt the above design in their own way, without too much trouble.
10. Assemble the Oven.
When the silicon on the reflectors has dried, place the oven box on
a table, and with help to support the reflectors, assemble the reflector
funnel on top of the oven box. Each reflector sits on top of the side of
the plywood box and against the frame piece to the inside of the box. Use
two corner clamps between each reflector.
When the oven is assembled in this way, make some small tabs of wood
or metal. These are mounted with wood screws on the top of the frame
pieces and can be turned against the reflectors to keep them from falling
forward as the oven is tilted. You can also put elastic straps of truck
inner tube from the box to the clamps on the reflector funnel to hold the
funnel on.
*Note 7/2003: for a more durable oven cover, we have found it helpful to build a wooden frame around the glass pane to protect it from cracking and breaking. Allow 1/8" gap around the edge of the pane for expansion when it heats up. For convenience, you can attach handles to the frame to make it easier to take on and off the oven.
11. Tracking the sun and other details
We provided our oven with some simple details to make it easier to
use. We put handles. made from bent electrical conduit at each end
of the oven box, to make it easier to carry around.
For maximal tracking, the oven should be adjusted every 30 minutes
or so in order to track the sun. (Note 7/2002: we have also found
that for days when the user is away from the oven all day, it is possible
to leave the oven in the morning with a slow-cooking pot of rice or beans,
and returning at the end of the work day, the food will be cooked.)
Rocks or bricks can be used to prop up the oven, but we found it more convenient
to place our oven on a simple hinge, mounted on a pole in the ground, so
that the oven can be tilted and rotated with ease. We placed an adjustable
support (a pipe sliding through another pipe with a wingnut for tightening)
at the back of the oven so that the tilt could be easily adjusted.
One can track easily by making sure that the sides of the oven make
little or no shadow on the bottom of the oven.
Good Luck -- enjoy building and using your solar oven!